A featured content slideshow with Drupal
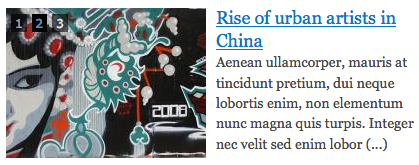
We already saw how to build a simple slideshow with NodeQueue and a bit of jQuery magic. This is perfect for exposing a product’s main features for example, however it requires somebody to manually select the content that goes into it. Now what happens if you are looking to build such a slideshow for, say, a magazine’s website that publishes a certain amount of content every day? Some editorial staff could be in charge of editing the list of content to appear in the slideshow, but automating things a bit would not be a bad thing… Well, let’s see how to do so with the help of Views, Teaser Thumbnail and, one more time, a bit of jQuery and theming overriding. For those impatient to see what we are going to build, go have a look at the slideshow in action.
Summary
For the sake of this tutorial I will presume that we use Drupal 6. Let’s try to sum up what we need; we want to display a collection of features entries from our website, displaying for each one of them the title, author, a teaser and a picture to illustrate it. To keep things simple I will use the Story node available by default in Drupal. I will also consider that featured nodes are in fact the ones that have the “Promoted to front page” publishing option (available in the edit form), although you could easily define a “Featured on front page” flag with the help of the Flag module that contributors use to administrate what is exposed in the slideshow.
Collecting the data
Retrieving the basic node information (title, teaser and author name) is going to be easy, however it will take a bit more work to get the picture. I will here make use of a module I developed a while ago precisely for the needs of a magazine; Teaser Thumbnail. In a nutshell, this module is going to parse every content that is submitted (and has the Teaser Thumbnail option enabled) and will be able to choose one of the picture from the body content or the attachments to build thumbnails to illustrate your content (it’s not rocket science).
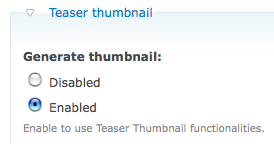
I leave you with the README.txt file bundled with it to get it installed. You then will need to enable it for Story nodes: go to admin/content/node-type/story and select “enabled” for the “Generate thumbnail” option in the “Teaser thumbnail” fieldset. You could also here select several things, like the minimum size a picture must have to be considered suitable for building a thumbnail; we don’t want to use a 10px large picture to build a 450px large preview of the article. If you don’t want to use the Teaser Thumbnail other than for the slideshow we are building, just make sure to select “disabled” for the “Teaser display” and “RSS display” options.
Once this is done, you will need to prepare an ImageCache preset we will use for building the thumbnail: mine is a “Scale and Crop” to 200px (width) by 150px (height) named “slideshow_featured”.

Let’s now build a view that will gather our content; go to admin/build/views/add and create a new “Node” view named “slideshow_featured”. Make sure to create a block display with the following settings:
-
Basic settings:
- Style: Unformatted
- Items to display: 5
-
Filters:
- Node: Type = Story
- Node: Published Yes
- Node: Promoted to front page Yes
-
Fields:
- Node: Teaser thumbnail (make sure to select “slideshow_featured” as the Thumbnail preset)
- Node: Title
- Node: Body
-
Sort criteria:
- Node: Post date desc
You can also directly download the views import file.
Now, we’re left with a hell of an ugly view: let’s get things styled!
Styling
The views theming mechanism is awesome; you can override every single output by simply creating files that follow naming conventions. I won’t detail further, but you should definitely be aware of Views theming capabilities. After previewing the view we built, you should have noticed that the information shown is fine except for the body field. Not only the content being displayed contains images, but it also is too long. If you click on the “Theme: Information” link on the views edit page, you will see that the display of that field can be controlled by adding a file named views-view-field—slideshow-featured—body.tpl.php in your theme folder. Here is the code we are going to put inside that file:
<?php
  // We strip HTML tags and trim
  print node_teaser(strip_tags($output), NULL, 200) .' (...)';
?>
This will remove all HTML tags (including pictures), trim the length of the text to 200 characters and add an ellipsis at the end of the string. You can download the views override file.
Now that the data is here and has the right format, we need to make it pretty and add the slideshow animation. I already explained in my previous tutorial how the slideshow effect is created. This time I add a bit more code to handle the pager that allows users to actually select the slide to display. The comments from within the source code should be enough to explain this additional feature. Notice that I also added a global variable that allow me to stop playing the slideshow effect after the user clicked on one of the pager links (basic usability need: you don’t want the user to fight against your slideshow to display content). Here we go, the CSS file (slideshow.css):
/* Add this file to your style.css file in your theme or include it in your page with drupal_add_css() */

#block-views-slideshow_featured-block_1 {
  position: relative;
}

#block-views-slideshow_featured-block_1 .view-content {
  display: block;
  position: relative;
  height: 150px;
}

#block-views-slideshow_featured-block_1 .views-row-even,
#block-views-slideshow_featured-block_1 .views-row-odd {
  background: white;
  display: block;
  font-family: Georgia;
  font-size: 14px;
  position: absolute;
  width: 500px;
}

#block-views-slideshow_featured-block_1 img {
  border: 0;
  float: left;
  margin: 0;
  padding: 0;
}

#block-views-slideshow_featured-block_1 .views-field-body,
#block-views-slideshow_featured-block_1 .views-field-title {
  margin-left: 210px;
}

#block-views-slideshow_featured-block_1 .views-field-title a {
  font-size: 18px;
  text-decoration: underline;
}

.slideshow-pager {
  position: absolute;
  left: 5px;
  top: 5px;
}

.slideshow-pager a {
  background: black;
  color: white;
  cursor: pointer;
  filter: alpha(opacity = 60);
  opacity: 0.6;
  padding: 1px 4px;
  margin-right: 5px;
}

.slideshow-pager a:hover,
.slideshow-pager a.active {
  opacity: 1.0;
  filter: alpha(opacity = 100);
}
You can directly download this code. Now for the jQuery (slideshow.js):
var slideshow_play = true;
var slideshow_view_id = 'slideshow_featured'; // The view id

$(document).ready(function() {
  // For each slide we are going to add a link that reveals it
  $('.view-id-slideshow_featured .view-content').each(function() {
    var slideshow = $(this);
    var number = 0;
    var pager = $('<div class="slideshow-pager">')
    $(this).children('div').each(function() {
      var slide = $(this);
      number++;
      var link = $('<a>'+ number +'</a>');
      pager.append(link);
      link.click(function() {
        // When we selected a slide we don't want to play the slideshow anymore
        slideshow_play = false;
        // Move the slide at the top of the stack and reveals it
        slide.hide();
	    slideshow.append(slide);
        // Move the active class on the link of the current slide
        pager.children('.active').removeClass('active');
        $(this).addClass('active');
        slide.fadeIn('slow');
      });
    });
    // We add the pager if necessary
    if (number) slideshow.after(pager);
  });
  // Run it once to initialize on the first slide
  switchSlide();
  // Every six seconds execute the switchSlide() function
  setInterval( "switchSlide()", 6000);
});

/**
 * Switch from one slide to the next one
 */
function switchSlide() {
  if (slideshow_play) {
    var slideshow = $('.view-id-'+ slideshow_view_id +' .view-content');
    var slide = $('.view-id-'+ slideshow_view_id +' .view-content > div:first');
    var pager = $('.view-id-'+ slideshow_view_id +' .slideshow-pager');
    // Move the slide at the top of the stack and reveals it
    slide.hide();
    slideshow.append(slide);
    slide.fadeIn('slow');
    // Move the active class on the link of the current slide
    pager.children('.active').removeClass('active').next('a').addClass('active');
    if (!pager.children('.active').length) pager.children('a:first').addClass('active');
  }
}
You can also download the source of that file.
You will need to include those two files in your page. You can do so by adding the following couple lines at the end of your template.php page:
drupal_add_js(path_to_theme() .'/slideshow.js');
drupal_add_css(path_to_theme() .'/slideshow.css');
And you’re pretty much done. Clear the theme cache (for example disable then re-enable your theme), add the views block to the page where you want to see the slideshow and you should end up seeing it.